When
we go to college, most of us don’t anticipate how little our closets really
will be and we often over-pack and find ourselves at Wal-Mart looking at the
hefty prices of those commonly used plastic bins. You can usually find a
three-drawer bin in white or black for around $20. Sometimes we are forced to
purchase these boring bins to store those extra t-shirts and tank tops that we had to
bring with us or maybe you’re in need of the extra storage for all those little
knick-knacks that you never thought would take up so much room. Regardless of
the reason, these bins are usually an eye-sore and because they are clear any
one that comes in your room is able to see right through your drawers. And
let’s face it ladies, maybe you’re storing your lady products in
there and quite frankly the entire world doesn't need to see that every time someone visit’s
your room. Or maybe it’s your food drawer and we all know that one friend who
asks for some of your food or “to try it” every time they walk in the room,
well I have a solution for you: paper inserts!
BEFORE

AFTER
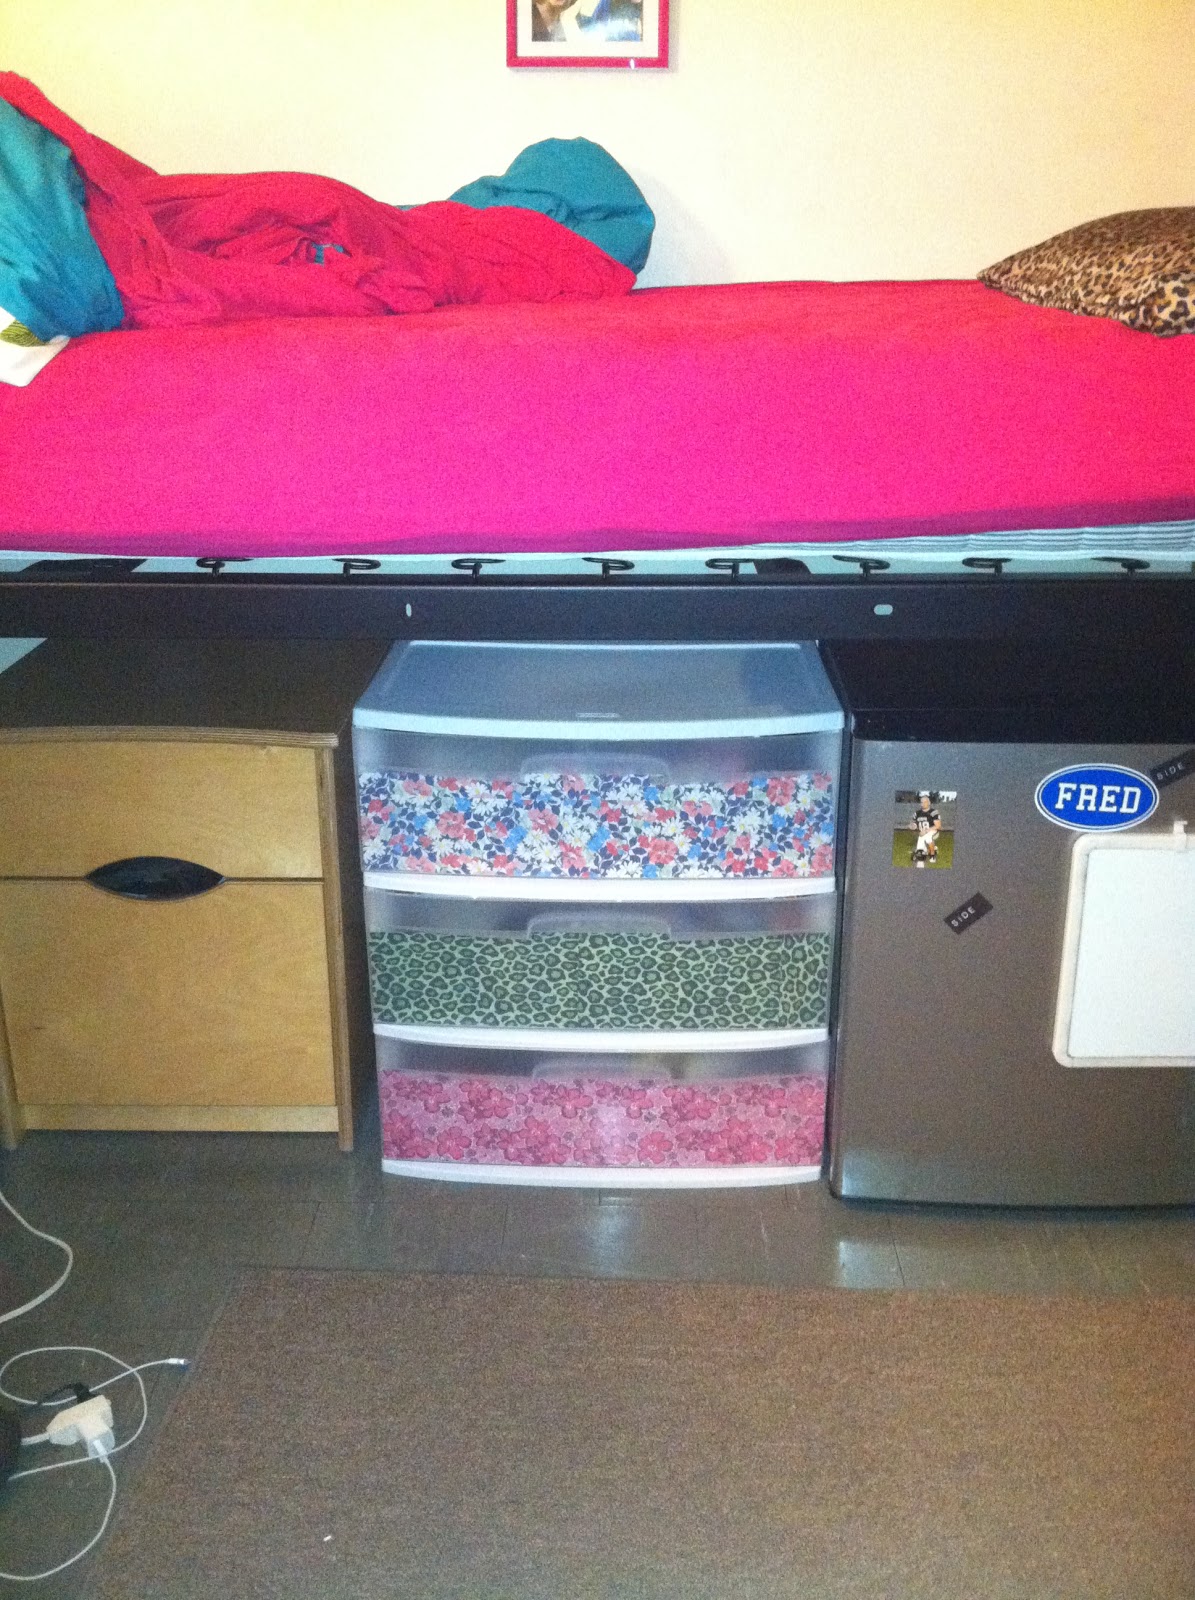
This
is a very simple DIY project that can be done in as little as fifteen minutes
and gives you room that extra flare and adds a nice personalized touch!
- · To get started I researched three different prints that I wanted to use on each of the three drawers and printed out two 8 ½ x 11 pages of the print as large as I could make it.

- · One print at a time, I placed them inside the drawer and traced on the back side (white side of the paper), with a pencil, the outline of the drawer so I knew where to cut it. I would give you dimensions on how to cut it, but the size will differ depending on the shape/brand of your drawers.
- · Once you do the first one and cut it out, you can just cut the remaining two patterns based on the size of the first one, to save time.
- · In my examples I used the extra scrap pieces that I cut off to place on the far right side of the drawer because my two papers weren't long enough. For some drawers, you made need to print off three pages of each pattern.
- · Finally, tape, from the inside of the drawer, the paper to the plastic part of the bin to keep it in place!
- · Now close your drawers and tap a step back to admire your new stylish masterpiece that is sure to get attention from the next person that enters your room!
For
this project you can do color themes such as this one:

I
choose three patterns that had pink colors in them.
- Lily Pulitzer Sigma Kappa Sorority Print
- Vera Bradley Very Berry Paisley Print
- Pink & Black Damask Print
Or
you can also do a pattern theme.

I
chose three Vera Bradley patterns.
- Summer Cottage Pattern Print
- Baroque Pattern Print
- Very Berry Paisley Pattern Print
Or
you can also do a random selection of your favorite patterns!

- Vera Bradley Summer Cottage Print
- Green & Black Cheetah Print
- Lily Pulitzer Sigma Kappa Sorority Print
Creating
a picture collage, using solid colors, or even using wrapping
paper would be
great ways to personalize this craft!
Thanks for reading, hope you enjoyed!
What patterns would you use?!
I absolutely love this idea, my roommate tried this and I have been meaning to do it myself! One big question though, did you print those pages on a printer or did you buy them? I feel like printing them on regular computer paper would be difficult since that type of paper is so flimsy and can be easily destroyed if something spills on it. I originally thought a more cardboard paper would work better, but then I saw those prints and wondered where you got them! What are your feelings on this, and what have you discovered works best?
ReplyDeleteFor this project I just did a Google image search and found three patterns that I wanted to use and printed out 2 full size pages (8 1/2 x 11) of the pattern on regular printer paper. Then I placed them inside the drawer and used scotch tape to keep them in place. Next, I used clear packaging tape on the inside of the drawer so you can't see the tape and placed the tape across the entire inside front of the drawer so it in a way "laminated" the paper and kept it free from tear, spills, or damage of any kind! This seemed to work for me so I hope that helps and answers your question! Thanks for asking though! And I never considered using cardboard behind the paper to make it more sturdy, but it would definitely do the trick!!
DeleteJust like Grace, i thoroughly enjoy this idea. not only is it creative it is personalized and anyone can do it. I used to do something similar by covering composition notebooks with fabric and prints. This idea is a hit no doubt. I am really curious as to wear you got your prints though. What prints and texture of fabric work the best for you?
ReplyDeleteI had never considered using fabric for this project, but it is definitely an idea to consider! And I love, love, love your idea of covering notebooks with fabrics and prints to personalize them! But for me, using computer paper and printing out patterns from the internet worked best. I might have to take you up on that suggestion though, and try this craft with fabric!
DeleteThis is really awesome. When I lived in the dorms I would do similar things but never thought of this one. I think it adds a lot to a room and can really make a dorm feel more like a home.
ReplyDeleteI'm glad you liked the idea! And I totally agree that it makes your room feel more like home. That's the main reason I choose to share this project!
Delete